Friday, June 6, 2014

Making a Monotread Robot

Monotread Robot

Inspiration

I was painting some miniatures last week and the idea popped into my head to make a faction of monotreads for Star Mogul.  I have a lot of materials laying around, and the idea quickly came together.  A friend of mine gave me a large number of plastic tape hubs which he uses at work - when the spool is empty, it is just tossed in the recycle bin, so he brought some of them to me.  The monotread for the robot is actually the hub for paper used in various machines, the most common I have seen is a printing calculator.

The materials

The materials I used are, as I stated above, the hub off of a spool of paper, the tread from a 1/35th scale Bradley AFV, a head from a resin Warmachine Khador warjack, two pieces from Lego to make the fork, a torso from a Bandai Mobile Suit (I am unsure of the one I used), and some bits from my bits box.

This picture shows the hub from the spool of paper from which I made the wheel for the robot and the track I used.


The knobs had to be cut from the tread so that it would fit flat against the hub.
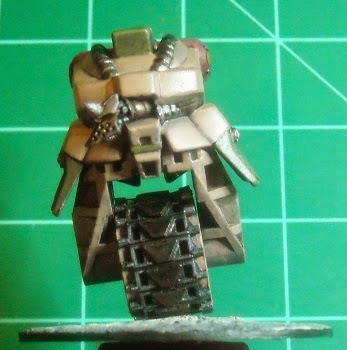
I had to grind the stubs down after cutting to give the treads a flatter surface.


 Here is the finished Robot...so far.  I have not yet created the arms, but will do so shortly.  I was working on some arms simultaneously with the robot, but they seemed too fragile and a bit too long.  I may use one of the fragile arms and make the other one a little more robust.

The torso from the Mobile Suit was a little rough, but I used it anyway.  It did not seem as well made as many of the Gundam models I have seen - maybe that is why they are relatively cheap.


Wednesday, May 28, 2014

Gort Beast of Burden

Alpha Forge Gort Beast of Burden


 The Gort Beast of Burden is my favorite sculpt from Alpha Forge.  I just finished this miniature recently, and wanted to post pictures to give an idea of size and how it looks painted.  I built this one right out of the blister.


Alternative Salvage Dog Truck

Another Salvage Dog Truck for Star Mogul

Supplies for this project

I have had the truck for this project sitting around for many years, but I was not sure what to do with it.  I finally decided to use it to make another Salvage Dog truck for the Star Mogul game - it is available for free online under the name of Salvage Crew.  In addition, I used a ski bit off of an old model, a twin bolter from Games Workshop, some old tire hubs I had, a segment of an octagonal piece from Robotix, some scrap plastic sheet, epoxy putty, a bumper piece off of an old model, and a cuppola from a 1/72nd model.

The Truck


 This is the truck upon which I will base the Salvage Dog Truck.  It was originally a toy which a friend of mine picked up on a resale shop and gave to me.  It has been sitting around for many years, because I could not find anything to do with it.  I had recently painted some of my Alpha Forge miniatures, so I had an idea for it.  Anyway, the first two pictures show the original toy with the wheels I removed from it, the new wheels, and the ski piece.  The new wheels came off of a much larger scale vehicle, but I felt that they achieve the effect I wanted.  The wheels in the picture are black, but the wheels I actually used were cream colored...I had just started the project before I took any pictures.

 Here is a side view of the truck I used.  It came from a line of vehicles called "Techno Tows".  As noted above, I have had it for quite a while because nothing about it gave me an idea for a use.


 This is the top view of the vehicle after I finished working on it.  The idea for the wheels was to have paddle type wheels for soft or unstable ground.  I cut off the bottom of the wheels so that I can mount the vehicle and make it look like part of the wheels is under the level of the ground.  In this particular case, I will finish it to make it look like a vehicle similar to those in "Dune".


 I would not have used this photo because of the poor lighting, but it shows the position of the twin bolters.


This is the side view with the twin bolters taken off.

Tuesday, October 11, 2011

Scratch Built Salvage Dog Truck

Inspiration

A few years ago I came across the Alpha Forge website and was impressed by the Salvage Dog Truck.  I searched the internet and found good prices on the line of miniatures at a hobby shop named "The Basement" I believe - the shop has gone out of business since.  I ordered a Salvage Crew special and an extra truck and some other things but was unsure of the length of time I would have to wait for my order.  I decided to try to scratch build a truck while I was waiting.

Tools

The tools needed for this project are a razor saw, a hobby knife, and a steel ruler.

Materials

The materials needed for this project are a small truck for the basis of the truck, a Games Workshop 40K Orc Truk bed end, the tracks from a Mega Bloks set or something similar, some plastic sheet, styrene glue, super glue, a turret mounted machine gun (I used one from the GW 40K range), some spare hubcaps and rims from an old model car, and some sprue,

The Project

In the picture, you can see that I based my salvage truck on a toy Tonka truck which was available in some kids meals some years ago.  If you want to use the same toy as the basis for your truck, check used toy and thrift stores - you may be surprised at what you can find there.
I removed the cab of the truck and the "hitch" on the back of the chassis, and removed the rear wheels of the truck.  I shortened the Mega Blok track by removing the middle section and glued the two ends to make my tracks using styrene cement.
Once I had gotten my tracks securely glued together, I cut the tracks down the middle lengthwise and attached the product to the chassis of the truck.
I built up the cab of the truck using sheet plastic and used a piece of Plastruct to make the drivers window.  I then used the hub caps and wheel rims off of the old model car to make the two hatches.  I used a piece of sprue to make the gun ring on the top of the cab and attached the modified GW machine gun to the top.
I cut the ends of the dump truck bed and attached the GW Truk end to one end and I cut and attached a piece of sheet plastic to the other end.

Conclusion

By the time my package arrived, I had already finished the scratch built salvage truck.  I quickly assembled a Salvage Truck from the order and was pleased with the result.  The two trucks were quite compatible and I thought that for the very small investment the truck I had scratch built was a very good project.

Monday, May 9, 2011

The first steps in making the Ork Gargant

I have been rounding up the materials necessary to create the torso and feet of the Ork Gargant.  This is going slowly because I have to search for the necessary components.

In the first photo, you can see the two bodies which I will use along with the "shoulder" pieces abd the "feet" and a plastic Easter egg.  The Easter egg is divided from one end to the other so all I had to do was remove the plastic part that allows one half of the egg to be connected to the other.  Also, I took the rounder end of a normal Easter egg and cut it in half to make the "toe" end of the "feet".  The bodies came from a box of battling robots which I purchased in the 1990s.  The bodies are very sturdy because the plastic is very thick.  You can see that I have started working on the yellow and gray body which is round, somewhat like a can, whereas the red and gray body is octagonal.  I have searched for these robots on the internet but have had no luck finding any.  Had I not had these bodies in my collection, I would have found something else to use.  One such item to use as a substitute is the body of a lamp (if it is plastic) and I have seen plastic bird feeders which would make a good substitute.  If you look at the red and gray body, you can see four spikes around the top of the body.  I have removed these spikes from the yellow body.  When I work on the red and gray body, I will remove the spikes as well.

Tools
The tools I have used for this part of the construction are a razor saw to remove the spikes from the top of the body, to remove the plastic rim on one side of the first Easter egg, and to cut the round part of the other Easter egg in half.  I used a file to smooth the parts which I had to cut.

Materials
For this project, I am using a body from a battling robots game (the controls were wired to each robot), some other parts from the battling robots game, and some Easter eggs.

Tuesday, May 3, 2011

Mega Miniatures now owns the rights to Alpha Forge Minis

I have a number of miniatures - some salvage trucks, Demolition robots, Hydrissian pieces, Mephalian pieces, robots, and some of the ganger miniatures.  I recently decided to try to buy some more robots so I went in search of a place to purchase them on the internet.  I found that Mega Miniatures now owns the molds of the Alpha Forge line and, in fact, has the rules and supplements as free downloads.  Go check them out if you have not already.  I highly recommend the Alpha Forge miniatures and Mega Miniatures as well.

The molds and the rights have been sold by Mega Miniatures, but I am unsure who has them.  Supposedly, someone bought the miniatures to augment his or her game which will eventually be released.

Thursday, April 28, 2011

The beginning of an Ork Gargant

I have not posted for a while...I have been remiss.  I want to bash together an Ork Scout Gargant and have been thinking about the pieces necessary to build it.  Understand that this will be a kit bash and not a scratchbuild so that I will not be working much with raw materials, but will instead work with parts from different items which I have acquired through the years.

Inspiration
The inspiration for the scout gargant is from about White Dwarf #112.  It may not be the correct issue, but the one I am remembering had two Imperial scout Titans in it.  I have most of the parts to build the Imperial scouts, so wanted to look for parts to build an Ork Gargant because it had not been done.  Yes, I have seen Gargants built from scratch before, but I wanted to make mine to be of the level of the Scout Titans from years ago.  Clearly, I have been collecting the parts for this project for years (maybe since the late 1980s) and now am undertaking the building.  Unlike previous projects which normally take 15 or 20 minutes for me to complete, I expect that this project will take a number of posts to complete.

Tools
The tools necessary to complete this project will probably run the board for me, meaning that I will most likely be using every tool which is in my toolbox.  Each post will have the tools for that part of the project listed separately.

Materials
I find that this project will be very exciting because I will be using some plastic Easter eggs which I have been saving for years.  Included with the Easter eggs will be a number of other plastic items gathered through the years.  Each post will have materials for that part of the project listed separately.